Sewer Cleanouts 101: The $20 Cap That Saves a $2,000 Dig—Find It, Label It, Use It
If you’ve ever had a toilet burp after a shower or a floor drain surge during laundry, you already know the feeling: panic followed by a frantic search for help. Here’s the truth most homeowners don’t hear until it’s too late—your sewer cleanout is the fastest, cheapest way to take control of a backup. One small cap gives pros instant access to clear the line, run a camera, and avoid unnecessary digging. This guide shows you exactly how to find it, how to open it safely, and how to use it to save time, money, and your weekend.
If your home is backing up right now, call for a same-day clear through Drain Cleaning. If the line has a recurring problem (roots, offsets, bellies), we’ll show you how a cleanout plus a camera-first visit leads to a targeted Mainline Repair instead of guesswork.
Free resource to include in your post: your city’s Public Works “side sewer/cleanout” homeowner guide. It shows typical locations, property line cleanouts, and marking tips before you dig.
What is a cleanout—and why does it matter?
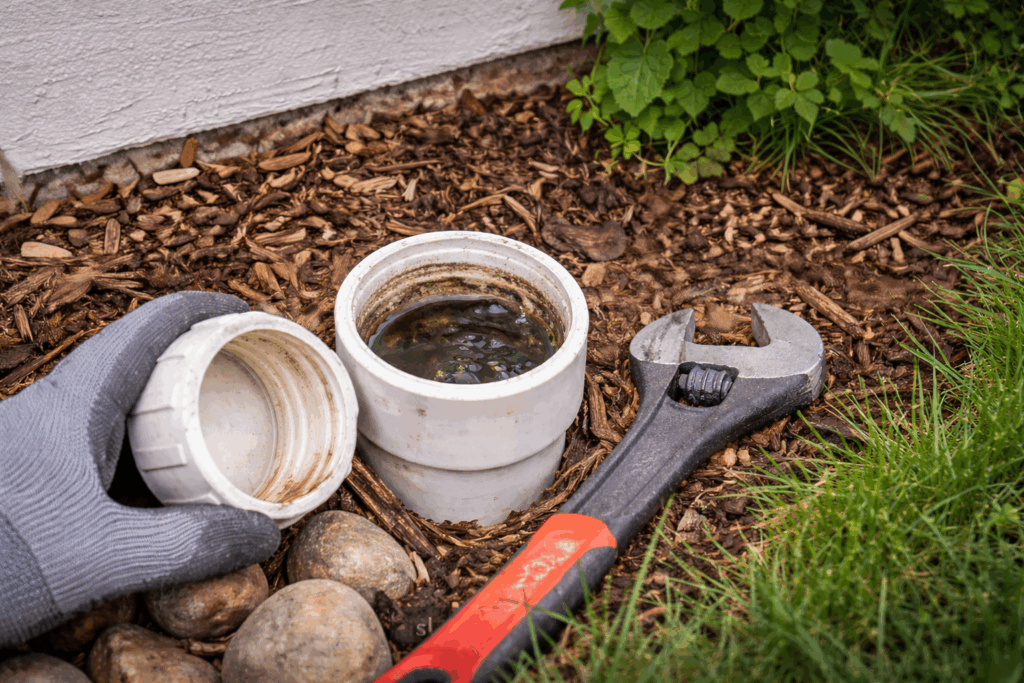
A sewer cleanout is a short vertical pipe with a removable cap that connects to your home’s main drain. It’s designed for two things:
Access for clearing clogs and root intrusions without tearing up floors or landscaping.
Inspection with a camera so you can see the pipe’s material, condition, and exact problem spots.
Without a cleanout, techs may have to pull a toilet or open a roof vent to reach the line—messy and time-consuming—or, worse, recommend digging because they can’t properly diagnose the blockage.
Bottom line: A $20 cap and a little access area can prevent a $2,000 dig.
Where to find your cleanout (and the tricky places it hides)
Cleanout locations vary by home age and layout, but these are the usual suspects:
Exterior wall near bathrooms (common on the downstream side of the home). Look for a 3–4″ round cap, often white or black PVC/ABS, sometimes painted to match siding.
Front yard near the foundation (pointing toward the street or septic). May be in a small box or flush with grade under mulch or grass.
Garage/laundry wall (especially slab homes). Check low along the wall where the main leaves the house.
Basement (older homes). A cast-iron plug on a branch of the main stack or a short stub on the floor.
Pro tip for winter/spring: Cleanouts love to hide under landscape rock, bark, or snow berms. Use a thin rod or screwdriver to probe for a hard cap within 1–2 feet of the foundation where the main exits. If grass looks patchy in a circular spot, you may be standing on it.
Two cleanouts? Even better. Many homes have a two-way cleanout: one opening points toward the house, the other toward the street or septic. That lets pros clear upstream and downstream and run a camera both ways.
How to confirm it’s yours (and not irrigation or storm)
Diameter: Most main cleanouts are 3″ or 4″. Irrigation caps are usually smaller and thin.
Material: ABS/PVC or cast iron. Irrigation is often green poly or thin PVC.
Location: Cleanouts align with your indoor drain path; irrigation valves cluster in a manifold box with multiple small lines.
Sound test: Lightly tap—solid thud for drain pipe; thin, hollow for irrigation boxes.
When in doubt, stop and call. Mistaking an irrigation box for a sewer cleanout creates a different kind of emergency.
Safe opening: the 90-second playbook (read this before turning a wrench)
If there’s an active backup, trapped pressure can cause a sudden release. Here’s how to open the cap safely:
Kill water use inside (no flushing, no faucets, no washer).
Put on gloves and eye protection. Sewer water is… sewer water.
If you have a two-way cleanout, start by cracking the downstream cap (toward the street/septic) slowly. Keep your body off to the side.
Turn counterclockwise with a large adjustable wrench or a strap wrench. If it’s stuck, don’t force it with a cheater bar—you can crack the fitting. Try a few drops of penetrating oil and a gentle tap around the cap circumference.
If water begins to rise as you crack the cap, pause; let pressure bleed off gradually before removing fully.
Once opened, a small amount of water may release. That’s normal. If you see heavy paper or roots right at the opening, that’s a strong indicator the blockage is nearby.
Do not:
Use acid or lye drain chemicals—dangerous for pros who follow and bad for your pipe.
Open indoor cleanouts you can’t control (e.g., buried basement caps) during an active backup; you could release sewage inside.
During an active backup: what to do (and not do)
Do this:
Stop all water use.
Open the downstream cleanout cap slightly to vent pressure.
Call Drain Cleaning and note “active backup” so we dispatch with the right nozzles and camera.
Don’t do this:
Don’t keep plunging toilets (you’ll just churn).
Don’t run the dishwasher or washer “to see if it clears.”
Don’t snake blindly from a vent; you can push the clog further or miss the real obstruction.
What we do when we arrive (and why it saves money)
Camera-first mindset. If flow allows, we camera immediately to see material (clay, Orangeburg, PVC), joint condition, and the exact location of roots, offsets, or bellies.
Hydro-jet, not just cable. Cables punch holes; jetting scrubs the pipe wall clean so the line actually regains capacity.
Mark and measure. We record distance and depth at every defect and mark them at the surface. That makes bids for Mainline Repair apples-to-apples—no guessing.
Leave access better than we found it. If your cleanout is broken or buried, we’ll quote a quick two-way cleanout upgrade so future service is faster and cheaper.
No cleanout… now what?
You still have options:
Pull a toilet for temporary access (messy, but possible).
Install a cleanout now (best investment). We cut in a two-way cleanout at grade with caps that sit flush and a small, tidy gravel apron. That upgrade alone can cut future service time in half and keeps you out of emergency pricing.
Property line cleanout (where supported by your city). Some municipalities allow or install a shared cleanout near the sidewalk for easier access to the public connection.
If you’re missing a cleanout or yours is damaged, ask for a quote during Drain Cleaning. We can usually add one with minimal landscape impact.
Why camera footage matters (and how to read it)
Good footage shows:
Time stamp + distance counter so you know exactly where you are in the run.
Material transitions (e.g., cast iron to clay at 6 ft, clay to PVC at 45 ft).
Defects labeled on-screen: roots at 22 ft, minor offset at 41 ft, belly from 63–68 ft.
From there, the right fix becomes obvious:
Joint roots in clay, barrel sound: Clean + point liner at the bad joint or full-length liner across the jointed section.
Deformed Orangeburg: Skip lining; pipe bursting to SDR PVC is the durable cure.
Single cracked PVC fitting: Spot dig or point repair; quick and precise.
Long belly: Only an open-cut grade correction solves standing water; we keep it as short as possible.
Winter & spring pro tips (Idaho homeowners, this is for you)
Mark it now. Before the next snow, stake or paint the cleanout location so you can find it with a dusting on the ground.
Keep it at grade. Don’t bury the cap under bark or decorative rock. Set a small paver ring so landscapers don’t cover it.
Add a second cap to your junk drawer. They’re cheap, universal, and handy when old caps crack.
Call before you dig. 811 utility locates protect you (and your wallet) if you’re exposing or relocating a cleanout.
Common myths (and the straight answers)
“We cleared it last year, so the pipe is fine.”
Maybe. A cable “clear” isn’t a clean; it doesn’t remove root fibers or grease film. If backups repeat, a jet + camera is overdue.
“We need to dig because we can’t get the snake through.”
Or you need a better access point or the proper nozzle. Cleanouts + jetting + camera solve most “can’t get through” cases without a shovel.
“Liners make pipes too small.”
A liner slightly reduces diameter but leaves a smooth, jointless interior. Flow usually improves compared to rough, rooty clay.
The five-minute homeowner checklist (print this)
Find the cleanout(s) and make them visible.
Label the downstream cap with a paint marker (“TO STREET/SEPTIC”).
Keep a strap wrench and spare 3–4″ cap in a kitchen drawer.
Add our number under [Drain Cleaning] in your phone.
If backups repeat, schedule a camera-first visit and keep the video link with your home records.
FAQs
How often should I have my mainline maintained?
If the line is healthy, no routine cutting is needed—just good habits. If you have minor root activity and aren’t ready to line, a jet every 12–18 months is typical (spring is smart).
Will jetting hurt old pipes?
We match pressure and nozzle to pipe material. The goal is bare wall, not blasting.
What if my cleanout is broken or missing a cap?
We’ll replace the fitting or install a new cleanout assembly. Running without a cap invites debris (and pests).
Isn’t pulling a toilet faster than finding the cleanout?
Sometimes, but it’s rarely cleaner or cheaper—and you can’t camera effectively from many toilet bends. Cleanouts win.
Bottom line
A visible, working cleanout turns an “uh-oh” into a straightforward service call: open, jet, camera, decide. You get proof of what’s wrong, a precise fix that lasts, and zero guesswork. Don’t wait for a weekend backup—find your cap, label it, and keep it clear.
If you’re seeing gurgles or slow drains, book Drain Cleaning and ask for a camera-first inspection. If the footage shows roots, offsets, or bellies, we’ll price the smallest, smartest Mainline Repair—liner, burst, or a short open-cut—so you never pay for a dig you don’t need.