Slab Leaks in Idaho Homes: Hot Spots, Quiet Meter Tests, and Smart Reroutes
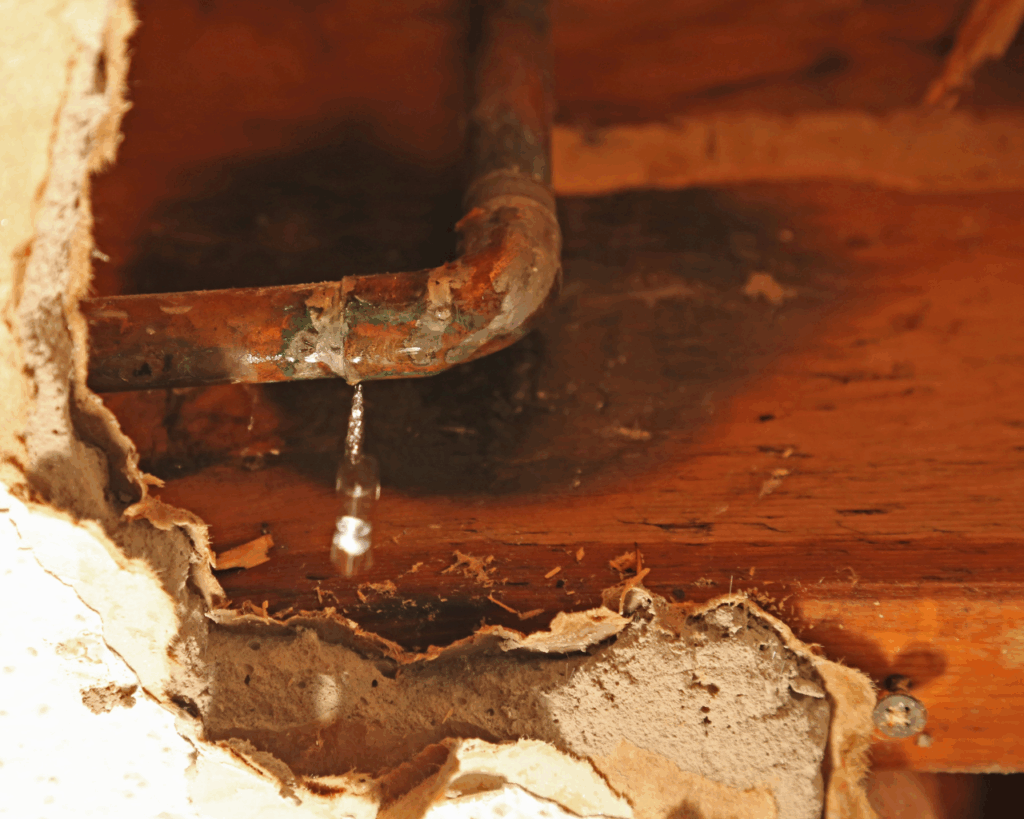
When a hot-water line fails under a concrete slab, it rarely announces itself with a dramatic geyser. More often it’s a warm patch on the floor, the sound of “shhh” in a quiet house, or a water bill that doesn’t make sense. In cold Idaho winters, hot-side slab leaks are especially common—expansion and contraction stress the pipe, and small pinholes become big problems fast.
This guide gives you a step-by-step home isolation test, what professional acoustic/thermal detection actually looks like, and a clear decision tree for reroute vs. breaking concrete. If water is actively coming up through the floor or your meter won’t stop spinning, use Emergency Plumbing. If you’re seeing early signs and want confirmation without ripping up floors, schedule Leak Detection.
Helpful resources you can reference:
- EPA WaterSense: How to spot and fix household leaks
Insurance Information Institute: Preventing water damage at home
Quick tells: do you actually have a slab leak?
- Warm spots on tile or LVP that never cool, especially along hallways that “feel like a heated floor” even with the heat off.
- Running sound with all fixtures off (put your ear to the coldest interior wall or to the water heater).
- 24/7 meter movement or well pump cycling when nobody is using water.
- Mildew at baseboards or damp carpet edges with no visible plumbing nearby.
- Sky-high gas/electric bills (heater constantly reheating water that’s disappearing under the slab).
If you have any of these, do the quiet meter test below. It’s the fastest way to confirm an active, hidden leak.
The Quiet Meter Test (10–15 minutes)
This is the simplest way to tell if water is moving when it shouldn’t. It works on city water and—if you have a pressure tank—on many well systems.
- Turn off everything that uses water.
Dishwasher, ice maker, washing machine, sprinklers. Make sure nobody flushes. - Find your main shutoff and water meter.
- City water: Meter is usually at the curb box; the small triangle/star dial (leak indicator) is your truth teller.
- Well: Watch the pressure gauge and listen for the pump cycling when no one is using water.
- City water: Meter is usually at the curb box; the small triangle/star dial (leak indicator) is your truth teller.
- Read the leak indicator.
- Still: Good sign—no movement.
- Creeping/spinning: There’s hidden flow somewhere.
- Still: Good sign—no movement.
- Isolate hot vs. cold.
- Close the cold inlet valve at the water heater.
- Recheck the meter.
- If the leak indicator stops, the leak is likely on the hot side (very common for slab leaks).
- If it keeps moving, you’re likely on the cold side or an exterior line.
- Close the cold inlet valve at the water heater.
- Isolate interior vs. exterior.
- Close any irrigation/yard shutoffs and repeat the check.
- If movement stops, the problem is in the yard line.
- If not, you’re dealing with a house-side leak—possibly in or under the slab.
- Close any irrigation/yard shutoffs and repeat the check.
Take photos of each valve you turned and your meter face. If you call us for Leak Detection, those photos speed up the job.
What pros do next (non-invasive pinpointing)
We combine three techniques to find the exact run without guesswork:
1) Acoustic listening
High-sensitivity microphones “hear” turbulence where water escapes. We survey along suspected pipe paths, compare sound signatures, and mark the loudest zones with tape.
2) Thermal imaging (hot-side leaks)
Infrared cameras pick up heat plumes in flooring when a hot water line is bleeding under the slab. On a cool Idaho morning, these plumes are obvious.
3) Line tracing & pressure tests
We pressure the plumbing in sections and, if needed, trace lines with a safe signal to map the route under floors/walls. The combination tells us exactly where the leak is—and equally important, where it isn’t.
No guessing. No Swiss-cheese floors.
Reroute vs. Break Concrete: how to choose the fix
Once we’ve confirmed a slab leak and mapped the line, you have two main paths.
Option A: Overhead/Wall Reroute (our go-to for many homes)
We abandon the leaking under-slab segment and run new pipe through walls/ceilings/attic, then down to the fixtures.
Why Idaho homeowners like it
- No jackhammers in living spaces; far less dust and disruption.
- Future leaks are accessible—not trapped in concrete.
- Often faster than trenching indoor floors.
Best candidates
- Hot-side leaks (easy to re-route from the water heater)
- Single bathroom groups or kitchens along interior walls
- Homes with attic/crawlspace access for straight runs
Considerations
- Small drywall patches with clean paint repair
- Pipe insulation through unconditioned spaces (freeze protection)
- Add isolation valves so you can shut off small zones later
Option B: Break Concrete & Repair In-Slab
We open a narrow trench at the marked spot, repair the failed section, re-bed with sand, and re-pour concrete.
Why it’s sometimes the right move
- Short, localized cold-side leaks near a manifold or entry
- No clean path for a reroute (e.g., vaulted ceilings, finished stone walls)
- You’re already remodeling floors in that area
Considerations
- Noise, dust control, and concrete cure time
- Flooring patch quality (we feather transitions and coordinate with your flooring contractor)
- If the pipe run shows multiple weak points, repairing one pinhole may not be the last—reroute might still be smarter.
Cost & timeline drivers (so you can plan)
- Length/complexity of new route vs. distance to the break
- Number of fixtures tied to the leaking branch
- Accessibility (attic height, finished basements, tile vs. carpet)
- Restoration (drywall/paint, flooring, baseboards)
- Emergency vs. scheduled (active leak under pressure = faster response)
We’ll price both options side-by-side so you can compare total project impacts, not just the plumbing line item.
Hot spots in Idaho homes (where we find slab leaks most)
- Between the water heater and the first bathroom group (hot side)
- Long hallway runs feeding kitchens/laundry on slab foundations
- At elbow fittings where thermal expansion stresses joints
- Near exterior slab edges where freeze/thaw is harshest
If your warm spot or “shhh” sound lines up with these routes, a hot-side leak is likely.
What to do right now if you suspect a slab leak
- Turn the hot inlet off at the water heater (if the meter stopped when you did Step 4 above).
- Kill the recirculation pump if you have one—it accelerates loss.
- Move rugs/furniture away from warm or damp zones.
- If water is surfacing or the meter spins fast even with valves closed, call Emergency Plumbing.
We can often stabilize the situation (temporary cap or bypass) the same day and complete a permanent reroute after you approve the plan.
How we keep the job clean (our site protocol)
- Plastic containments and floor protection from the door in
- Negative-air/dust collection if we must open concrete
- Daily cleanup so you can live in the home during work
- Moisture checks before we re-close any walls or floors
- Photo log of valves and new routes for your records/insurer
After the fix: prevent the next one
- Pressure matters. High static pressure is the #1 stressor on lines and water heaters. We test and set your PRV and verify the expansion tank charge.
- Add isolation valves during reroutes so small parts of the house can be shut off without losing everything.
- Annual heater service (flush + anode check) reduces thermal hammer on hot lines.
- Leak sensors under the water heater and at low points notify you early.
For quick background on household leak prevention and why pressure management matters, see EPA WaterSense’s free guidance: Fix a Leak.
Insurance & documentation (what adjusters usually want)
- The leak detection report (photos, meter readings, IR images if used)
- Scope & map of the failed line and the chosen route/repair
- Moisture readings after mitigation
- Invoices broken into mitigation vs. repair vs. restoration
We provide a neat packet so you don’t have to chase paperwork while dealing with fans and dehumidifiers.
FAQs
Can you “line” a water line under a slab like a sewer?
No—potable water lines aren’t lined the way sewers are. The right fix is reroute or spot repair through the slab.
Why are hot-side leaks more common?
Heat cycles expand and contract copper or PEX fittings more often, and hot water dissolves minerals faster, which can accelerate pinholes.
Will shutting the hot inlet harm my heater?
No. Just avoid running long hot taps while it’s off. If you have a recirc pump, switch it off until we’re done.
How fast can you find and fix it?
Leak confirmations are typically same-day. Many reroutes are completed in one visit; concrete repairs depend on cure time and flooring coordination.
Ready for confirmation without the mess?
Start with a no-guesswork visit: quiet meter test, acoustic/thermal survey, and a reroute-vs-break comparison you can approve on the spot. If water is already surfacing or your meter won’t stop moving, tap Emergency Plumbing now. Otherwise, book Leak Detection and we’ll protect your home before small turns into big.